Device Types Guide
Understanding Composite Devices, Logic Units, Logic Devices, and Legacy devices
Device Types Comparison
| Feature | Composite Device | Logic Device | Logic Unit | Logic Unit X |
|---|---|---|---|---|
| Status | Current | Current | Current | Legacy |
| Setup Method | Visual pairing wizard | Visual pairing wizard | Quick add | Quick add |
| Input Configuration | Capability + source devices | Zone/room selection | Manual JSON | Manual JSON |
| Input Count | 2 or more source devices | Dynamic (2-10, auto-expands) | Dynamic (2-10, auto-expands) | Fixed (2, 3, 4...10) |
| Formulas Per Device | Not applicable | Single formula | Multiple formulas | Multiple formulas |
| State Changed Trigger | ✓ Aggregated value | ✓ Yes | ✗ No | ✗ No |
| Best For | Sensor and alarm groups | Simple setups, beginners | Advanced users, multi-formula | Not recommended |
⚠️ Legacy Devices
Logic Unit X (2, 3, 4...10 inputs) devices are still functional but deprecated. Use Logic Device or Logic Unit for new setups.
Composite Device
v1.10.22 testCombines one shared capability from multiple Homey devices into one continuously updated virtual sensor or alarm.
- • Numbers: average, minimum, maximum, sum, or median
- • Alarms and booleans: any/maximum, all/minimum, majority, count on, or percentage on
- • Clock and text values: average clock time, minimum/earliest, maximum/latest, most common, or most recently updated
- • Resilient: continues with available sources and raises a Source Error alarm when a member is missing
Logic Device
RecommendedThe easiest way to create boolean logic devices with a visual pairing wizard.
Key Features
- ✓ Visual Setup Wizard - Browse zones/rooms to select devices and capabilities
- ✓ Dynamic Input Expansion - Starts with 2 inputs, auto-expands to 10 based on formula
- ✓ Single Formula - Simplified configuration for straightforward logic
- ✓ State Changed Trigger - Get notified on any state change with state token
When to Use
- → You're new to Smart (Components) Toolkit
- → You need only one formula per device
- → You want visual device selection during pairing
- → You want the "State changed" trigger
Setup Example
1. Devices → Add Device → Smart (Components) Toolkit → Logic Device
2. Pairing wizard:
- • Input A: Living Room → Motion Sensor → alarm_motion
- • Input B: Living Room → Lux Sensor → measure_luminance
3. Device Settings → Configure formula:
[
  {
    "id": "motion_light",
    "name": "Motion & Dark",
    "expression": "A AND B",
    "enabled": true
  }
]
Logic Unit
AdvancedPowerful device for advanced users who need multiple formulas or prefer JSON configuration.
Key Features
- ✓ Dynamic Input Expansion - Starts with 2 inputs, auto-expands to 10 based on formula
- ✓ Multiple Formulas - Configure multiple independent formulas per device
- ✓ Manual JSON Config - Full control over all settings
- ✓ Advanced Features - First Impression mode, timeout detection, isolated input states
When to Use
- → You need multiple formulas per device
- → You're comfortable editing JSON
- → You need advanced features (First Impression, timeouts)
- → You want maximum flexibility
Multiple Formulas Example
[
  {
    "id": "day_mode",
    "name": "Daytime Security",
    "expression": "A AND B",
    "enabled": true,
    "timeout": 60
  },
  {
    "id": "night_mode",
    "name": "Nighttime Security",
    "expression": "A OR B OR C",
    "enabled": true,
    "timeout": 30,
    "firstImpression": true
  },
  {
    "id": "away_mode",
    "name": "Away Mode",
    "expression": "(A OR B) AND NOT C",
    "enabled": false
  }
]
Each formula maintains its own input states and can be controlled independently.
How to Configure and Use It
- Add Logic Unit (Dynamic) from Smart (Components) Toolkit.
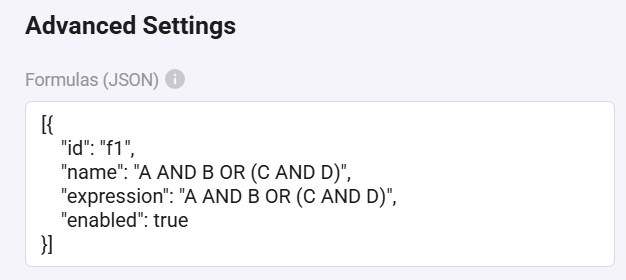
- Open the device's Advanced Settings and enter a JSON array in Formulas (JSON). Inputs are the letters A through J.
- In a Flow, use Set input value for formula to set each input true or false. Use both the true and false branches of the source card so the Logic Unit always receives the current state.
- Use Formula changed or Formula changed to... as a WHEN card, or Formula result is as an AND card.
A AND B OR (C AND D).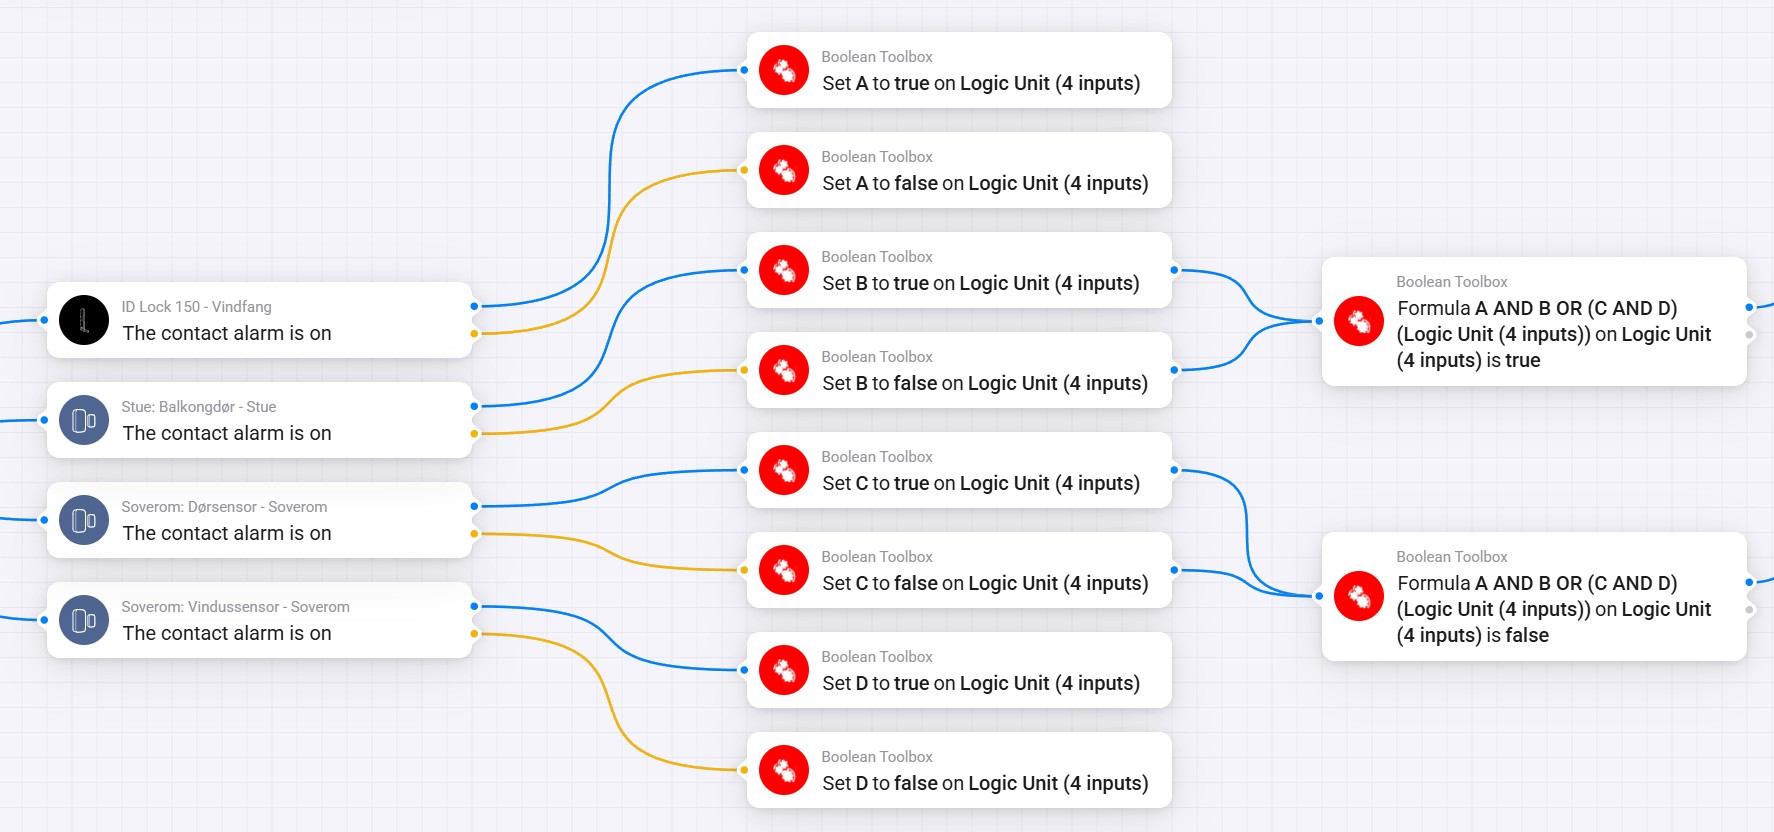
Device Capabilities
Both Logic Device and Logic Unit share these standard capabilities:
alarm_generic
booleanThe aggregate formula result (true when any enabled formula is true)
- • Exposed as the read-only Formula result alarm
- • Can trigger Homey's standard alarm turned on/off cards
- • Read-only (changes based on formula evaluation)
- • Use the formula-specific Flow cards when a Logic Unit contains multiple formulas
onoff
booleanEnable/disable the device
- • User controllable (can be toggled in UI or flows)
- • When OFF, formulas don't evaluate
- • Use to temporarily disable logic without changing configuration
Dynamic Input Expansion
Both Logic Device and Logic Unit automatically expand inputs based on your formula requirements:
How It Works
- 1. Device created with 2 inputs (A, B)
- 2. You save formula:
"expression": "A AND B AND C AND D" - 3. Device detects formula uses C and D
- 4. Device automatically expands to 4 inputs (A, B, C, D)
- 5. New inputs appear in UI and flow cards
💡 Tips
- • Maximum 10 inputs (A-J)
- • Expansion happens on formula save
- • Unused inputs are hidden but still available
- • Works with all formula types (single or multiple)
Formula Isolation & Flow Behavior
⚠️ Important: No Flow Isolation
Within a formula, there is no isolation between flows. This is by design to allow formulas to work across multiple flows.
What This Means
Scenario: Multiple flows using the same formula
Flow 1: Set input A = true for formula "security"
Flow 2: Set input B = true for formula "security"
Flow 3: Triggered when formula "security" = true

Result: Flow 3 triggers when (A AND B) from different flows!
When You Need Isolation
If you need to use the same logic in multiple places within one flow with isolated states:
Solution: Create Multiple Device Copies
- 1. Create "Motion Light - Kitchen"
- 2. Create "Motion Light - Bedroom"
- 3. Each has the same formula but isolated state
- 4. Can be used independently in the same flow
💡 Pro Tip
For Logic Unit with multiple formulas: Each formula IS isolated from each other (formula "A" doesn't affect formula "B"), but each individual formula can be accessed from any flow.
Migration: Logic Unit X → Logic Unit/Device
⚠️ Legacy Device Warning
Logic Unit X (2, 3, 4...10 inputs) devices have fixed input counts and should be migrated to the new dynamic devices.
Migration Steps
-
1. Choose New Device Type
- • Single formula → Logic Device
- • Multiple formulas → Logic Unit
-
2. Copy Formula JSON
Go to old device settings → Copy the entire formula JSON
-
3. Create New Device
- • Logic Device: Use pairing wizard or paste JSON in settings
- • Logic Unit: Paste JSON in settings
-
4. Test Formulas
Verify all formulas evaluate correctly with test inputs
-
5. Update Flows
Replace old device references with new device in all flows
-
6. Remove Old Device
Once verified, delete the legacy Logic Unit X device
✅ Benefits After Migration
- • Automatic input expansion (no need to choose 2, 3, 4...10)
- • Future-proof (new features only added to current devices)
- • Better performance with event-driven architecture
- • State changed trigger (Logic Device only)
Best Practices
✓ Use Descriptive Names
Name devices and formulas clearly: "Motion Light - Living Room" instead of "Logic 1"
✓ Start Simple
Begin with Logic Device for single formulas, upgrade to Logic Unit when you need multiple formulas
✓ Test Formulas First
Use the Boolean Logic Emulator to verify expressions before deploying
✓ Use Device Copies for Isolation
Create separate device copies when you need the same logic with isolated states
✓ Leverage Dynamic Inputs
Don't worry about input count during setup - devices expand automatically based on your formulas